Many server administrators want to shrink partitions after running their server for a period of time. For example, they may need to shrink a large volume to create a new one, or shrink the D drive to expand the system partition. Since many administrators prefer using a command-line tool, this article explains how to run Diskpart to shrink the C drive or any data volume in Windows Server 2016.
How to Shrink a Partition with the Diskpart Command
It is very easy to shrink a partition with Diskpart in Windows Server 2016. Follow the steps below:
- Press Windows + R together on the keyboard to open Run, type diskpart, and press Enter.
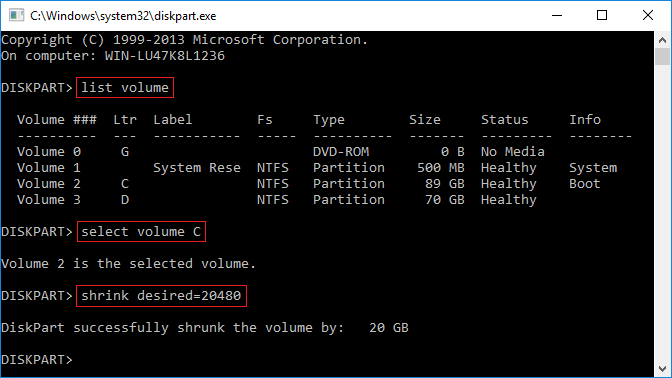
- Type list volume and press Enter in the diskpart.exe command prompt window.
- Type select volume C and press Enter. (C is the drive letter or volume number of the partition that you want to shrink.)
- Type shrink desired=20480 and press Enter. (20480 is the amount of space to shrink in MB.)
Within a short time, Diskpart reports that it has successfully shrunk the C drive by 20GB.
If you type shrink without specifying an amount in step 4, Diskpart will shrink the partition to release the maximum available space.
Limitations of Diskpart shrink command in Windows Server 2016
While it is entirely possible to shrink a volume with Diskpart in Windows Server 2016, not all partitions can be shrunk. In fact, there are many limitations when shrinking partitions using the Diskpart command line.
- It can only shrink NTFS partitions. If you attempt to shrink FAT32 or any other partition types, you receive the error message: "The volume cannot be shrunk because the file system does not support it."
- If you specify an amount to shrink but there is not enough available free space, you will receive a Virtual Disk Service error: "The specified shrink size is too big and will cause the volume to be smaller than the minimum volume size." You may encounter this issue while shrinking the C drive if there are "unmovable" files located on it. (Learn why you cannot shrink the volume)
- The unallocated space created by shrinking a partition cannot be extended into another volume. This restriction applies whether you want to shrink the D drive to expand the C drive or shrink the C drive to expand the D drive. When you run the Diskpart extend command after shrinking a partition, you receive the error: "There is not enough usable free space on specified disk(s) to extend the volume."
If you cannot shrink the C drive with Diskpart in Windows Server 2016, cannot shrink a FAT32 partition, or cannot extend a volume after shrinking another, you can use NIUBI Partition Editor.
A Better Way to Shrink the C or D Drive in Windows Server 2016
Windows Server 2016 includes another native tool, Disk Management, which provides a GUI-based Shrink Volume function. However, it shares the same limitations. Unlike the Diskpart command and Disk Management, NIUBI Partition Editor is a better choice because:
- It supports shrinking and extending both NTFS and FAT32 partitions.
- It can move "unmovable" files, allowing you to shrink a partition to its minimum size if needed.
- It can create unallocated space on either the left or right side when shrinking a partition.
- The unallocated space shrunk from a volume can be combined with any contiguous or non-adjacent partition on the same disk.
- It is much easier to use, requiring only a simple drag-and-drop on the disk map to shrink and extend partitions.
download NIUBI Partition Editor and follow the steps in the video.
How to Extend the C Drive by Shrinking Another Volume:

How to Extend D Drive by Shrinking Another Volume:
- If you want to shrink a partition and extend another non-adjacent volume, there is an additional step required to move the partition.
- The process remains the same whether you operate a physical server with an SSD, HDD, or RAID array, or a virtual server within VMware/Hyper-V.
- If the partitions you want to shrink and extend are located on different disks, follow the steps to copy the disk to a larger one.
Besides shrinking and extending partitions, NIUBI Partition Editor helps you move, merge, clone, convert, defrag, wipe, and hide partitions, scan for bad sectors, and do much more.